FL Studio has become the go-to DAW for most producers nowadays due to the rise in its popularity and its user friendly nature.
Many professional music producers like Metro Boomin’, Southside, Zaytoven and many others are known to use it in their production work.
In the music production world, it is an essential requirement to be able to provide the track outs to a project whenever the situation calls for it.
Now that the internet has become so popular and at its absolute peak, more and more people are collaborating on music projects without being in the same studio at the same time.
Online beat licensing platforms such as Beatstars and Airbit offer music producers around the globe a platform on which they are able to connect and sell beats to artists from different parts of the world. This alone cannot stress the importance of track outs enough.
Basically, the tracked out files to a music project are the soloed out individual Wave files to every element in the music project composition.
These files are sometimes referred to as stems.
For example, if a hip-hop instrumental is composed of a kick, snare and hi-hat, what this means is that when the instrumental is exported as a tracked out file, it will have 3 individual wave files consisting of the kick, snare, and hi-hat elements separately.
In essence, there are two types of track outs; wet track outs and dry track outs.
The wet track outs of a beat or song are track outs that are rendered out with all of the effects that were used and added on each individual track in the process of making the beat or recording the song.
Dry track outs on the other hand are rendered out with no effects on any individual element including the master, even if some tracks had effects on them, when exporting dry track outs, these effects are turned off.
Most of the times engineers will specify whether they looking for wet or dry track outs, in any case that you’re not sure, ask the engineer their desired preference.
You can also just have two separate folders, you can export the dry track outs in one folder and export the wet track outs in another folder.
Basic Understanding
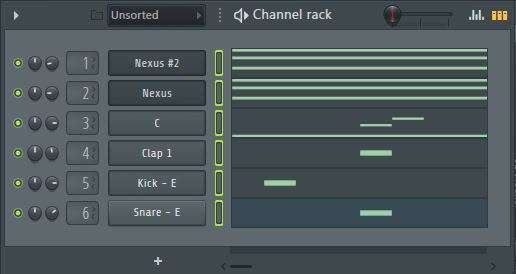
When making beats in FL Studio you’re basically adding VST’s or samples in your channel rack and then using the piano roll to make your melodies or other patterns with your VST plugin or samples.
Each time you add a new VST plugin or sample, it is added as a new channel in the channel rack. You can also drag and drop samples into the playlist and they will be added to the channel rack as audio.
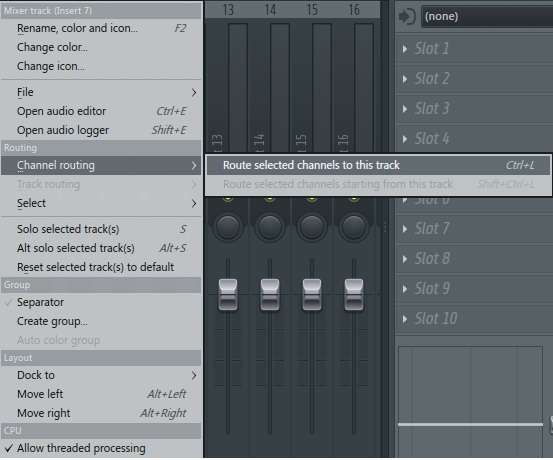
To further have the ability to process the sample or VST plugin, you simply route the channel you want to any free mixer insert by simply selecting the channel then going over to the mixer (or you can simply press F9 to access the mixer), then right click any free mixer track, then go to Channel Routing then finally click and select Route selected channels to this track.
Basically, understanding channels and how you route them to the mixer track is the most important knowledge you will need in the process of exporting track outs in FL Studio.
The following are the steps of how you export Track outs in FL Studio:
Step 1: Make the Beat or Song
The first is thing is to obviously start making and finish the beat and have it ready for exporting.
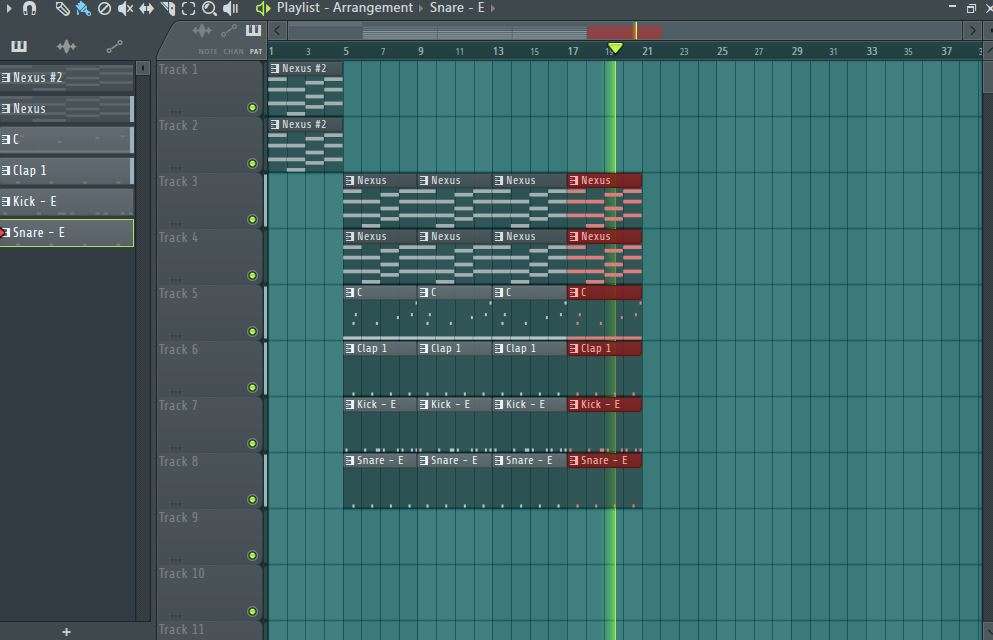
Make sure the beat is arranged how you want it to be arranged because the track outs to the beat will follow the exact same arrangement you make in the playlist section of FL Studio.
Add your transition effects; add your producer tag and everything else you want in there.
In this initial stage, also set up a new folder where you’re going to export your track outs and name it accordingly.
Step 2: Route all song elements to mixer
The second step is channel routing.
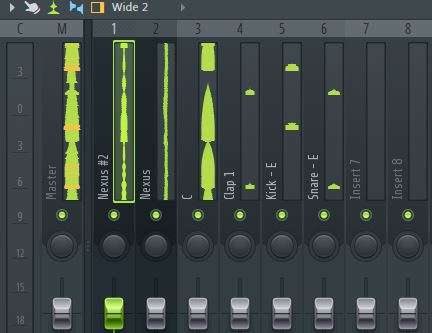
Here you’re going to select all the channels in the channel rack that are being used in the beat or song and you route each channel to a free mixer track.
Some people prefer to route the channels to the mixer whilst in the process of making the beat or song while others route the channels after they are done making and arranging the beat or recording the song.
Depending on your preference, whichever method you go for is perfectly fine, so long as you have each individual channel being used in the beat or song ending up on the mixer.
For example if you are making a beat that is made up of a kick, snare, guitar, and 808, you will need to route each one of these elements to the mixer track.
You will also want to rename the channels in the mixer if they are labeled incorrectly. It will be easier for the mix engineer to identify the elements when you do.
Make sure all the mixer tracks are enabled and not muted in the mixer; if any of the mixer tracks are muted they will be exported as muted.
Remember if you want to export wet tracks then leave all the effects on the mixer tracks on, and turn the effects off if you want to export dry tracks.
Step 3: Optimize the Export Settings
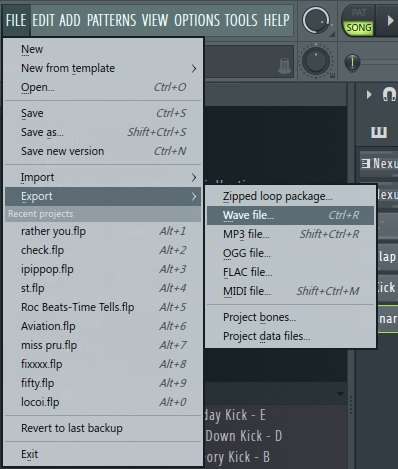
First things first, select the area you want to export in your playlist, then click File, then go to export, then in the drop down menu go to Wave, then select the folder in which you want to save the track outs or you can simply press CTRL + R then simply select the destination folder you want for the track outs, then click save.
You want to make sure you save the project by its original name and also ensure that you indicate the BPM. In some cases it is also a good idea to also include the key in which the beat or song was made.
Next you’ll get the render menu. In the render menu do the following:
Change the mode to song in Project type so that you export the full beat or song the way it is arranged on the playlist.
Change the tail to leave remainder in Project type so that the track outs don’t just cut abruptly at the end.
Make sure only WAV is selected because you’re exporting track outs. Understand why WAVE is the best format.
Change the Wav bit depth to either 16 bit int or 24 bit int or 32 bit int, depending on the quality you’re going for. I personally go for 16 bit int or 24 bit int.
Is 16 bit enough? FIND OUT HERE
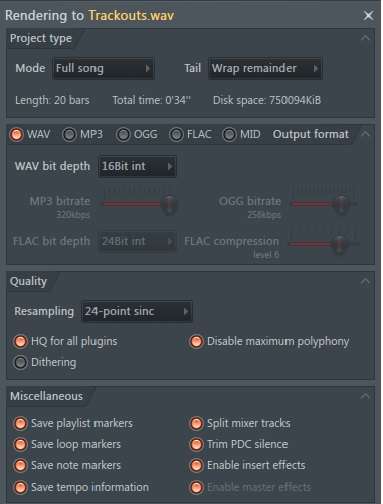
Under quality, set the resampling to 128-point sinc, and then make sure you select: HQ for all plugins, Disable maximum polyphony, Alias-free TS404 and set you resampling to 512 point.
Lastly under the miscellaneous tab, make sure Split mixer tracks is selected. This tells FL that it has to render the individual wav files of each element that has been routed to the mixer.
Remember if you want to export wet tracks then select enable insert effects, and turn the enable insert effects off if you want to export dry tracks.
Step 4: Export
Finally you can export the track outs by clicking on the export tab. After the rendering is done, go and locate the destination folder you chose for your track outs.
Once you find the track outs, drag and drop them in the playlist of your FL and check if all the tracks are there. If some are missing then you need to do Step 2 again.
If your exported tracks OR SONGS sound too quite, Read this article
Step 5: sending the track outs
So you now have your track outs in your folder, the only thing that is left is to send them.
When it comes to sending track outs I prefer sending them via Google Drive. You’ll first have to compress the stem folder in order for you to upload the zipped folder in google drive, once you upload the zipped folder you can now just share the google drive link with the person you’re sending the files to.
Google drive is a good way to send the files because you also get to keep a copy of the files in your google drive.
When preparing files for mixing its always important to prep them right. THIS ARTICLE will walk you through how to prepare audio files for mixing.
HELPFUL RESOURCES
Image line – Multi-Track Stems Export
RouteNote Blog – How to export stems in FL Studio – a guide
Home Music Maker – How To Export Stems In FL Studio (Step-By-Step Guide)
ADG Mastering – How to Export Individual Tracks in FL Studio For Mixing
Omari MC – How To Track Out A Beat In FL Studio 12 In 60 Seconds